The SVX Sound Install Experience
Author: Gavin Haslett
Printable Version | Submit FeedbackThis is additional information and pictures added to a document posted on the web by Gavin Haslett that, without this information, would have added time and misery to this job for me. The greatest amount of information listed here is to his credit and not mine. Many thanks to Mr. Haslett for his efforts.
If you're reading this page, you're probably aware that installing an aftermarket stereo in a Subaru SVX is not a prospect to be taken lightly. Don't get me wrong, it's not that it's a bad thing to do, it's just finding the information you might need for the install is not that easy to come by. Hopefully I'll remedy that situation with this page I'm writing to detail my experiences with installing an after-market stereo in my 95 SVX lately. (Mine is a '92 SVX) An install that, by the way, ended up taking the better part of three days simply because finding the right information is not easy. (Now it's only a few hours depending upon ability and luck)
Choosing a stereo.. well that's your own personal choice. I personally chose a Sony CDX-C760 that was on sale at Best Buy. One of its nicer features is an included remote that screws into the side of your steering column (or wherever you want it) that controls all of the features of the stereo without having to push buttons on the faceplate. Nice if you want to keep your eyes on the road too rather than looking at your stereo all the time. It came with the "stereo-end" of the wiring harness. "Cool," I figured, "all I need to do now is find the other end of the harness to go into the existing wiring... splice them together with some connectors from Radio Shack and I'm flying!" This turned out to be the bug-bear... but we'll get to that soon. Anyway, when I purchased the stereo I deliberately checked the parts books for the appropriate wiring harness. Sure enough there was an SVX listed... even a part number for the harness. Great. They had them in stock too... fantastic! I paid $15 for it (ouch!), but figured it would make my life so much easier...
1. The Physical Install
Okay, the physical install wasn't really all that bad, but here's the instructions for those of you wanting to do this yourself. First a disclaimer though; this install was done on a 1995 SVX... though the install will probably be virtually identical for a 94-97 SVX, 92-93 may be slightly different. Please if anyone has any info on what might be different, please let me know.
Well, now that's out of the way here we go.
Tools Required
- Flat-bladed screwdriver (small)
- Phillips screwdriver (mid-size is best)
- Wire clippers... the sharper the better
- Solderless connectors and crimping tool
- Plastic putty knife
Parts Required
- Car antenna cable Y-adapter
- 2 Antenna extension cables (2 foot, 1 male to male and 1 male to female)
- Suitable wiring harness (If available, I did mine without this)
Removing the factory stereo is not that hard. I'll hopefully have some pictures up here soon detailing the install... but for now just bear with me and try to visualize.
Disconnect the negative cable to your battery. Set the parking brake and/or chock the wheels.
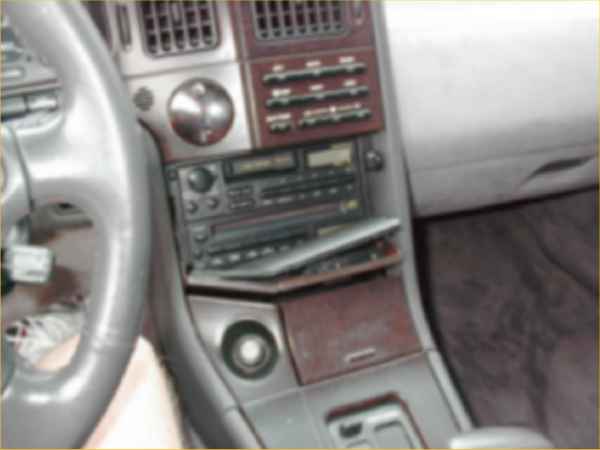
First open the door covering the stereo housing. Manually pull it up a little from the resting point, get a firm grip around the black trim-piece that's inside the door covering the pushbutton mechanism that lets the door open, and carefully pull it off. It just snaps on and off so that shouldn't be too much of a problem.
Second, you'll see a screw (maybe two, mine had one) at the bottom of the bezel that goes around the stereo housing. Remove it, then use a pair of needle-nose pliers to grab the edge of the bezel and gently pull it out. Apart from that one screw there's nothing else holding it on. It might get caught on the bottom of the environmental controls... just try to wiggle it free.
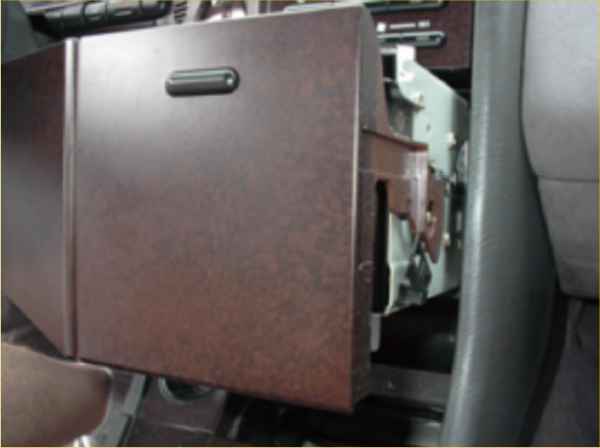
Once removed you'll see two screws at the top of the stereo housing. Remove these also. At this point you might want to remove the ashtray as this will make the rest of this install easier.
Close the door that covers the stereo... this is important as it's attached to the physical stereo housing. Use the shift lock button to move the gear selector to "1" to get it out of the way of your work. Please a hand towel or something on top of the shift console to protect it from being scratched. Reach in through the hole opened up by the ashtray and gently pull the door toward you. When it moves slightly forward, reach back in through the ashtray hole and you should feel a metal lip pulled slightly away from a cross-bar that the stereo attaches to. You might want to use this to continue pulling the stereo out as it's sturdier than the plastic door!
Cautionary note: the mechanism for the door has a tendency to catch a piece of the grey trim that folds around the main housing. You can use a plastic putty knife to push it out of the way if this occurs.
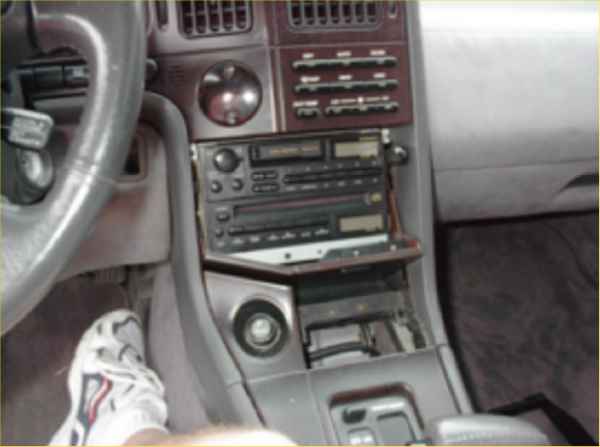
Once you've got the housing out you'll find that it maybe only pulls about an inch away from the dash.
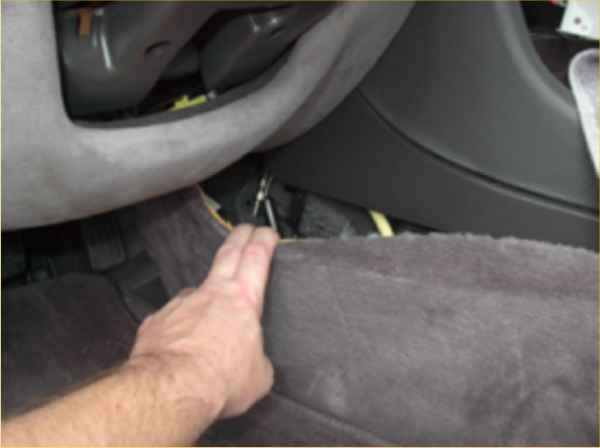
This is because the antenna cables are pretty short and don't have a lot of slack on them. The connections for the cable are under the plastic trim on the driver's side of the shift console. Pull the lower plastic panel away and pull up the carpeting to pull the connections apart.
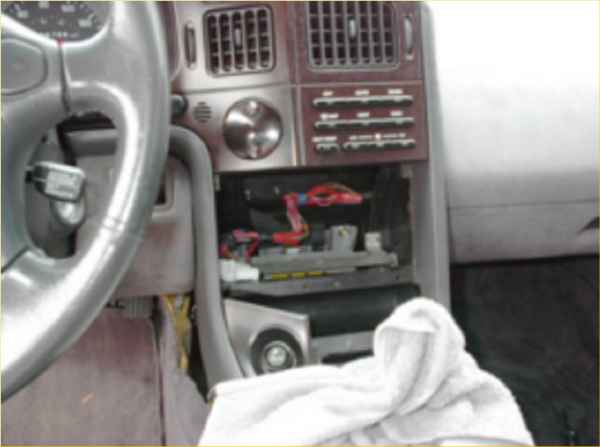
You can pull the stereo out the remainder of the way and disconnect the wiring harness at this point. You should now be able to pull the entire enclosure free of the car.

There are four screws that hold the stereo in the metal frame. Remove these and slide the stereo out. Get your after-market stereo and put this into the metal frame where the old one used to be... use the same 4 screw-holes but you'd be better off using any screws supplied with your stereo than trying to use the ones that were in the old one... they probably won't fit. If you purchase a non-Japanese product, ie: Blaupunkt, you may have to modify the frame to mount the unit(s) in the bracket. If there is a support screw on the back of the unit, cut it off. You will not use it and if it is the bottom unit it won't fit.
You may also have to make some modifications to the plastic face so it'll fit into the space... remember the first plastic bezel you removed fits rather tightly onto the factory stereo... the new one will have to be the same size to fit comfortably. If you have an amp or something to install in the spare space in the frame you can do it now and wire it to the stereo. Be careful not to let wires work their way outside the frame... the frame fits rather snugly in the hole. If you've got a stereo with a removable face you might want to have it removed throughout the rest of the procedure to reduce the risk of damage to it.
2. The Electrical Connections
Here's where things get sticky. For your reference, know now that there is currently NO wiring harness available for the 94-97 SVX. 92-93 SVX's use the same wiring harness as the old Subarus according to what I've read... apparently the stereos changed between 93 and 94. If somebody wants to tell me that there IS a wiring harness available, please let me know and I'll put a note to that effect on this page. I searched for three days through all the auto-sound dealers in St. Louis, then phoning around a few nationwide specialists like Crutchfield. It just doesn't seem to exist. You're going to have to do this the hard way I'm afraid. (Again, I did mine with solderless connectors)
I'm assuming for the sake of this document that your stereo came with a wiring harness to hook it up to the cars wiring. You're also going to need the installation instructions and/or color-code sheet of the wires from the stereo or wiring harness. If your stereo wasn't provided with one, talk to your stereo dealer, they should be able to get you one (but it might cost).
Compare the pinouts on the connector on the cables to the pinout table below. If it matches 100% you're flying... if it doesn't I'm afraid you're on your own. It SHOULD be the same, and the color codes should be the same too (I got them from a 1994 service bulletin). (1992 is the same)
Carefully snip all the wires from the back of the connector and strip the ends. If you're using butt type solderless connectors then at this point start crimping connectors on the ends of the wires too.
Referencing the following table, plug the wires in according to the instructions provided with the wiring harness. For example, if your harness instructions say that the green cable connects to the front-right speaker positive terminal, then find the wire in the following table connecting to that same terminal and splice these two together (in this case it's a red wire with a yellow stripe). Repeat for all the required pins. There are three pins in the connector that will not be used; a black/red cable, a red one and a pink one. These can be bundled up together, capped off (insulated end cap) and ignored. The black/red and red cables connect to the secondary connector that hangs loose in the SVX... that's meant for the factory CD player and won't be used for after-market equipment.
Table of Connections
| Connection | Polarity | Factory Color | Factory Pin # |
| Right Rear Speaker | + | Blue/Yellow | 1 |
| � | - | Red/White | 10 |
| Left Rear Speaker | + | White/Red | 2 |
| � | - | Red/Black | 11 |
| Right Front Speaker | + | Red/Yellow | 8 |
| � | - | White/Black | 19 |
| Left Front Speaker | + | Brown/White | 9 |
| � | - | Green | 20 |
| Earth Connection | � | Black | 17 |
| Power Antenna | � | Black/Green | 18 |
| Memory Power | � | Blue/Red | 5 |
| Primary Power | � | Brown/Red | 6 |
Source - Subaru Service Bulletin circa 1994. Contains updates to service manuals. Converted to this table 1998 by Gavin Haslett
Note that the pinouts are stamped on the plug itself... if the color of the wire doesn't match the pin listed in the above table then I'm afraid you may be on your own. These wire colors ARE from Subaru's own documentation so should be accurate.
You can connect these up in any order you like... it doesn't make any difference.
Get the antenna Y-connector... you can get these from Radio Shack (that's where I got all the plugs and connectors for my install by the way) for a couple of bucks, then simply plug the new antenna cables into the Y-connector. Personally I then put a 2ft antenna extension cable onto the Y-connector. That was simply because I wanted a bit more slack in the antenna cable so I could actually get the stereo in there with minimal fuss and bother. I then used some insulating tape to attach the Y-connector to the back of the space where the stereo fits. Nice and neat.
Use some more insulating tape to bind up the cables. Even though your solderless connections (assuming you used them) probably are already insulated, I usually tape them up... partly to relieve the strain of the wires and partly just for safetys sake.
You can also use cable-ties to tie the ables up, or duct tape, or whatever takes your fancy. I simply used the insulating tape because I had plenty of it.
3. The Final Phase
You've completed your physical install in the chassis... you've wired up your wiring harness (hopefully successfully)... you're now ready for the fun part; actually putting the stereo in place. This bit is self-explanatory really... I'm just putting it here for the sake of completeness.
Connect up your cables; namely the antenna cables and the wiring harness. Also attach any other cables you need to... such as the cables leading to a CD-changer if you've got one.
On the '92 there is a bundle of wires that appear to come from the environmental controls that may get in the way. Pull these toward the front of the cavity that the stereo resides in.
Slide the housing into the space being careful not to trap any cables outside the chassis. Cock the front of the stereo assembly slightly toward the left as if to push the unit in toward the right-hand side of the car. This should help to get past the bundle of wires mentioned above.
Personally I fed excess cable into the empty space below the newly installed stereo. There's a hole in the bottom of the chassy you can use to manually pull the cables in while you're installing. (Provided you are installing a single DIN unit) If you've also installed an amp this might be a little more difficult... just improvise. Personally mine didn't quite fit in perfectly so I had to try a few times. Put the two upper screws in first. Be careful here... the trim does get in the way sometimes and it can be awkward. Your needle-nose pliers might come in handy here.
Put the bezel back in place. Simply push it on and put the lower screw in. If it keeps getting caught on the new stereo then you're going to need to make some minor modifications to the face of the stereo. (Mine fit perfectly with out any mods. If need be I recommend modifying the bezel and not the stereo faceplate). Personally, all I had to do was break off four plastic pieces designed to hold the supplied plastic bezel in place. Seeing as the SVX has its own factory bezel to fit around the double-height frame I didn't need either the supplied bezel or the mounts. After that it fit like a glove.
Take the little piece you took from inside the door and pop it back into place. It can be awkward but it will go back on eventually. (Mine will not go back in without being modified. I've yet to do this.) You can also put the ashtray back now.
Put the car in Park, Check the manual for your stereo fuse rating. Your new unit might need a different rated fuse than the 15A fuse already in there. Reconnect the Negative battery cable.

Voila! You have a new stereo system. Next step; simply turn the car to "ACC" and crank it. If you get sound you're flying... if not then something's wrong. If you only get sound on one side of the car, chances are one of your connectors came loose as you were pushing the stereo in. (Note the remote on the steering wheel)
4. Notes and memoranda
The following are just some simple notes I made during the installation that I thought I would pass on to you.
If you complete your install and find that you've got power to, say, eject a CD, but there seems to be no power to the unit to actually play... then chances are you've blown the fuse. I made this mistake and thought a connector had come loose so I pulled the stereo out only to find it was fine but the fuse was blown. For the sake of experimentation I put a similarly rated (15A) fuse back in and it's been working fine ever since. I can't find anywhere in the manual where it says what amperage the unit requires, so if it blows again I'll just put a 20A in there. If that fails the unit might be faulty.
Be careful! Remember that when these SVXs are built they put the stereo in, THEN install the interior trim... you know, the nice padded dash stuff. As a result the stereo doesn't come cleanly out of the hole. You shouldn't have too much difficulty, but the hole with the padded stuff is actually slightly smaller than the frame and mechanism the stereo's in. A flat-blade screwdriver or plastic putty knife is handy here. The entire interior is also painfully easy to scratch and snag on the metal frame; try not to rip it.
The technically astute among you will have noticed the lack of the tweeters in the wiring table. They're just spliced into the front-speaker wires at some point inside the dash.
There's probably a few optional components you can add that'll make things better for you. As I mentioned before my Sony came with a wired remote control that you can put wherever you like in the car. Personally I mounted it on the right-hand side of the steering column below and slightly behind the windshield-wiper controls. This puts it in easy reach but stops it getting in the way of other controls. This was a pretty simple matter of removing the top of the steering column by releasing the screws on the underside and popping it off (it does clip as well so don't be afraid to use a little force). Then I pulled down the section of the underside of the dash where the coin-holder is (totally useless BTW)... that section just clips into place BTW. Anyway, I opened that up and there's a hole right there leading into the stereo bay. Obviously I did this before putting the stereo back in place. By the way, there's a nice gap in the steering column where you can run wires through... very handy for this kind of thing.
If you don't feel competent enough to do the install detailed here, take it to a professional who can do it for you. They might charge you a bit (estimates I got STARTED at $75), but it might be worth it for peace of mind. However, I'm certain even a professional will cut you a little slack if you provide them with the wiring table above... sure beats the hell out of trying to find the right wires by hand.
Subaru's Official Line
Okay, now something I feel obliged to include because this came from Subaru while I was researching the connections above. Please read it BEFORE you start working on the install;
Welcome to the Web site and thank you for your inquiry. We are delighted to hear that you are interested in accessories.
We do offer a Subaru CD player for your SVX. The part number for the CD player is 416E150. The part may be out of stock because we stopped producing the SVX in 1997. You would have to check with your dealer (where you would have to order the part from). If the CD for the SVX is out of stock, we believe that the CD for the Legacy will work with your car. Again this information should be checked with the Subaru Parts Manager at your local Subaru dealership. We do not recommend the use of after market products.
It's that last comment that's key; Subaru neither endorses nor even recommends the procedures I've detailed here, and doing so on a newer model SVX will almost certainly invalidate some section of your warranty. My car is out of Subaru warranty anyway, so I feel I can do this. However, if you have some kind of extended warranty on your car you might want to make sure that doing this doesn't invalidate that either (some companies frown on people who fiddle with their electrical system).
Document Creator's Notes:
As it was, in order to find the wiring arrangement listed above I had to plough through several service manuals at a friendly local dealership, as well as some service updates. Even upon finding the right circuit diagrams it took some study to figure out what goes where (wires frequently changed color between the speakers and the plug!) I wouldn't recommend doing this kind of research yourself unless you have to... it was time-consuming and tiring. It was also frustrating to be constantly told that I either couldn't or shouldn't install an after-market stereo in an SVX, or that a wiring harness is unavailable for my car.
Was it worth it? Well, I've only had it in for two days now, but I think so. The stock stereo is good... but you can't beat being able to pick and choose your own sound system that suits YOUR individual needs. I like the SVX for this kind of thing because it's obviously been designed for expandability (dual-height bay; meant for the stock stereo and the factory CD player but easily turned to a CD/Receiver and an amp). The speakers are damn good speakers... which is just as well because they're near impossible to remove effectively, though I'm sure some people will find the bass somewhat disappointing. As I said it's just fine for me... at least for now.
Please, if this document's been of help to you, drop me a line at thumper@brainfart.com and let me know! (I couldn't reach Mr. Haslett at this address)
Enjoy the SVX... I still say it's one of the best and most fun to drive cars in its class, and almost certainly one of the most versatile. Look after it; it's a rare gem.