How-to Replace SVX Seat Covers
Author: Nordique14
Printable Version | Submit FeedbackMy car is a 1995 L model. Therefore, the front driver’s seat is manual, not power. Also, the rear seat is a one-piece fold down, not a two-piece fold down. If you have a car that has a power seat and a two-piece rear fold down seat, do not despair. I suspect that the differences are negligible and this document will still be of benefit.
Since the front passenger seat and the front driver’s seat are basically the same, this document will only cover the recovering of the driver’s seat. I will also include some specific info on how to recover the rear seats. But if you can do the front seats, the rear seats will be easy.
Tools needed:
- 100 pack 4” multi-purpose ties (i.e. zip-ties) for front seats
- 100 pack 4” multi-purpose ties (i.e. zip-ties) for rear seats
- sockets - 14mm, 12mm (passenger side only), 11mm (to remove rear seats)
- Phillips screwdriver
- flathead screwdriver
- needle nose pliers
- wire snips (to cut through metal rings)
- scissors
- safety glasses
- sandwich bags (to hold screws and other small parts)
Time to complete:
Each front seat will take about 4-5 hours
Back seat will take about 4-5 hours
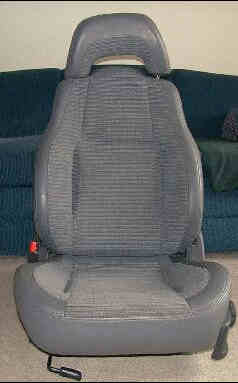
Fig 1. Driver’s seat with original cover
Removing the front seat from the SVX:
- Slide the seat all the way back. Remove the caps covering the front rails on the right and left sides. This will expose the bolts. Side the seat all the way forward and repeat the process for the back bolts. Not that in the back, the side closest to the center console will have two bolts instead of one. All bolts are 14mm.
- If you are removing the driver’s side, you will need to disconnect the wiring harnesses that attach to the seat. Pull the seat out part way making sure you don’t pull on the wires. Disconnect both wiring harnesses by squeezing the bottom.
- Drag the seat to the garage or inside. Make sure the place is well lit as you will need good light. Plus, it will take a couple of hours to complete.
Removing the headrest:
- It is very important that you remove the headrest first. The seat back will not come off (or it will rip) unless you remove the headrest first
- Pushing on the little pin at the bottom of the headrest on the top of the headrest post. There is only one for each seat (the other post will not have one). Once you push it all the way in, you should be able to pull out the headrest.
- If you are recovering the headrest, take a flathead screwdriver (or similar) and work both ends of the headrest zipper free. Unzip the headrest cover and pull it off.
- Take the new cover and put it on. Zip it up. Use the flathead screwdriver to tuck the lose zipper ends inside the headrest.
- Put the headrest aside for later.
Removing the seat parts:
- Remove the lumbar support lever. Use a sandwich bag to keep the lever and the screw together.
- Pry off the screw covers on either side of the seat back. Be careful as the seat back is very easy to damage. Remove the screws. Pull off the seat back.
- If you have manual seats, you will need to remove the two round knobs that adjust the seat height. Each one is held on by a clip. You will need to get in there with a flat head screwdriver and play around until they pop off. Before you take them off, make sure the seat bottom is as far down as it can go.
- Remove the cap and screw that is between the two knobs.
- Remove the tilt lever.
- Turn the seat upside down. Take a pliers and push on the white clip holding the plastic cover on. Push up on the cover to remove it.
- To remove the plastic cover on the other side, move the seat all the bay back on the rails. This will expose a screw. Remove it and pull upwards on the plastic piece to remove it.
- On either side of the seat at the front, you will find large screws. Remove them. The front part of the seat should now tilt up. Note that for that passenger seat, it is 12mm bolts instead of large screws.
- Make sure the back part of the seat is tilted as far down as it will go. You should now see, on each side, a large screw exposed. Remove them.
- Remove the wiring harness clipped onto the bottom of the seat. Gently pry it off with a flat head screwdriver. Also snip the zip-tie that attaches the cord to the underside of the seat.
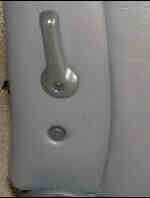
fig 2. Lumbar support lever and seat back cap covering a screw
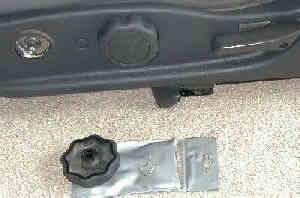
fig 3. Rotary know removed by prying off metal clip (manual seats only)
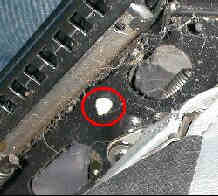
fig 4. Remove the outside plastic cover by pushing on the white plastic push clip

fig 5. Remove inside plastic cover by removing the screw
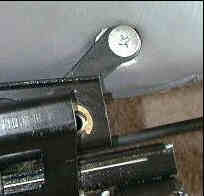
fig 6. Remove the large front screws on either side
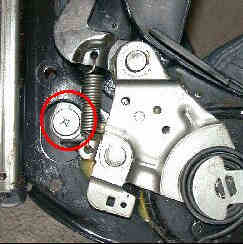
fig 7. Large rear screw exposed

fig 8. Wiring harness attached to the bottom of the seat
Note: Wear safety glasses when snipping the metal rings. Pieces can fly at you. So either wear the safety glasses or look for a nice pirate-type eye patch.
Removing the bottom cover:
- Using metal snips, remove the metal rings that hold the bottom cushion to the top cushion.
- The bottom seat cushion should now be easy to remove.
- Let’s do the bottom cushion first. Remove all the metal rings from the bottom cushion.
- Peel back the cover. The cushion sill separate from the metal frame. The cover is still held onto the cushion by more metal rings found underneath the cover. Remove the metal rings one at a time by peeling back the cover enough so each metal ring is exposed enough to snip off.
- Remove what is left of the metal rings from the cushion with a needle-nose pliers.
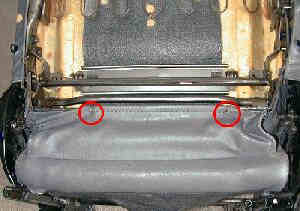
fig 9. Metal rings holding the bottom cushion to the top frame
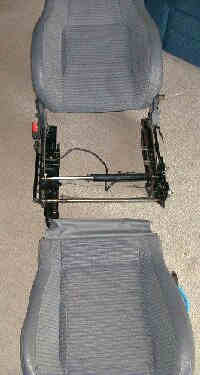
fig 10. Bottom seat cushion removed
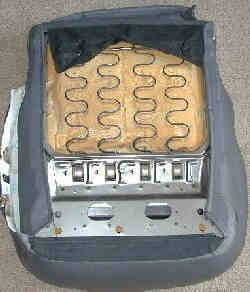
fig 11. Underside of bottom cushion
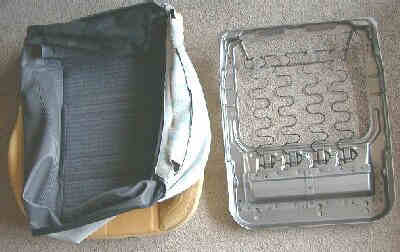
fig 12. Bottom cushion separated from the frame
Note: Check to see if the new seat cover has all the proper metal wires around its edge and in the middle part. Use the metal wires from the old cover if you don’t have them already in the new cover.
Attaching the bottom cover:
- Prepare the cushion by wrapping zip-ties around the part of the cushion where the metal rings were. Note that it is easier if the zip-tie connector part faces toward the outer edge of the seat cushion.
- Place the cover on top of the cushion. Wrap each zip-tie around the metal wire on the inside of the cushion. It is very important to make sure that the zip-tie goes AROUND the metal wire. If you attach it to the cloth part only, it will eventually rip and separate. Don’t tighten the zip-tie right away. Tighten them as needed by pulling on loose end.
- Cut off the extra length of each zip-tie.
- Put the cushion back on the frame and wrap the cover around the cushion and the frame.
- Attach the cover to the frame with more zip-ties, tightening each zip-tie and cutting off the extra length as needed.
- The bottom cover is now complete. Put it aside for later.
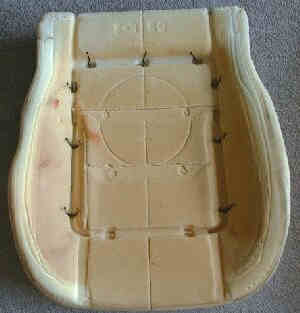
fig 13. Bottom cushion with zip-ties ready for new cover
Removing the top cover:
- Follow the same basic procedure for removing the bottom cover.
- In addition to the metal rings around the edge, there are also two exposed metal rings that are used to hold down the inside. They need to be snipped from the outside.
- Once you fold back the cover, you will notice that the bottom is held on with a long metal rod that attaches to the frame. This rod needs to be removed.
- Loosen the two 14mm bolts found on either side of the frame. Note that you do not have to remove them, just loosen them.
- You can now pull off the rod.
- Remove the old cover.
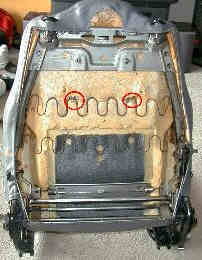
fig 14. Rear of top cushion. Note the additional metal rings that need to be removed.
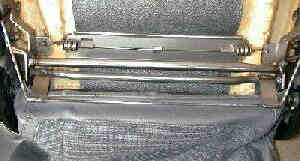
fig 15. Metal rod holding the top seat cover to the frame
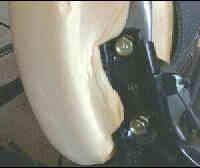
fig 16. Loosen the bolts on either side of the frame to remove the metal rod.
Attaching the top cover:
- Stretch the cover around the frame.
- Insert the metal rod into the proper holes in the cover. Attach the rod to the frame.
- Tighten the bolts on the side to keep the rod in place.
- Follow the same basic steps you used to attach the bottom cover. Remember that the top part of the inside cover is attached from the back of the seat. Do not tighten the top two zip-ties until you read the next step.
- There are two ways to attach the cover by the headrest holes. The Subaru way is to just stretch the cover around the headrest holes. I found that too be too loose. My method is to wrap the cover around the bottom of the headrest posts. To do this, pop up the headrest posts by squeezing the bottom and pushing up. Then wrap the holes in the cover around the bottom of the headrest posts. Then push down the headrest posts. I find this to be a much cleaner fit.
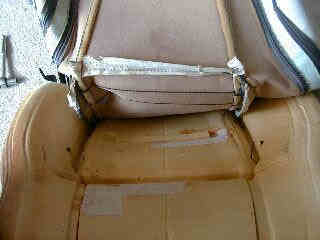
fig 17. Attach the inside of the front cover
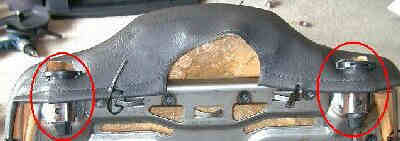
fig 18.1 Top cover on overtop the headrest posts
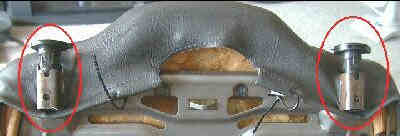
fig 18.2 Headrest posts up with top seat cover underneath the posts
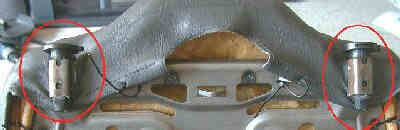
fig 18.3 Top seat cover on under the headrest posts returned to original positions
Putting the seat back together:
- Push in clip back into the headrest. Do NOT put on the headrest yet. Just put the clip back on.
- Replace the bottom cushion. Screw in all four large screws.
- Reattach the wiring harness to the bottom frame. Remember to zip-tie the cord to the frame too.
- Zip-tie the fabric that covers the wiring harness to the bottom frame.
- Zip-tie the bottom cover to the top frame.
- Reattach the outside plastic cover (the side with the seat belt) using the screw.
- If you have the manual seats, place the metal clips on the rotary knobs. Push the knobs onto the posts until you feel them click. Give them a good tug to make sure the clips are keeping them attached to the seat.
- Reattach the seat back.
- Insert the headrest.
- Drag the seat back to the car.
- Reattach the wiring harnesses.
- Bolt the seat to the frame. Do not forget this step. Enjoy the view from your SVX in the comfort of your new seat.
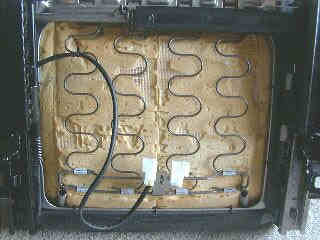
fig 19. Wiring harness clipped back onto the bottom seat cushion
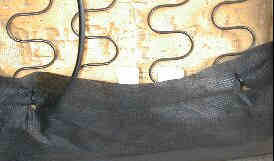
fig 20. Fabric that covers the wiring harness is zip-tied

fig 21. New seat ready to be reinstalled in the SVX

fig 22. Ready to go for a drive
Rear seat tips:
The rear seats are much easier than the front seats. The best way to make things easy for yourself is to use a flathead screwdriver to push down the foam while inserting the zip-tie onto the frame. To remove the rear bottom cushion, pull the tabs located at the bottom front of the cushion. Then push forward and down to unhook the back. To remove the top section of the rear seat, unscrew the two plastic pieces that attach the trunk carpeting to the rear seat. In each corner you will find two 11mm bolts. Remove them. The top part of the rear seat will then easily come out. You can use the same instructions from the front seats to learn how to remove the old covers and put the new ones on.