Spark Plug Replacement
Author: Ryan MacDonald
Printable Version | Submit Feedback- Basic socket set, wrenched and extensions (12 mm and a short and long extension)
- A universal socket joint is very helpful, but not required.
- Long flat blade screwdriver
- 5/8” spark plug socket
- Jack & Jack stands
- New plugs of your choice
Removal of the old plugs and installation of the new ones.
If you remove the battery and air box, it will allow easier access to the first two plugs on each side of the engine.
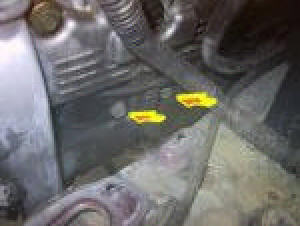
You will notice that the plug wires are different than other cars. Each plug has its own coil for power instead of using a master coil that provides power to all of the plugs. You can see in the picture below, two of the coils. There are 12 mm bolts that hold each individual coil in place. You can start with the one on the right, closest to the front which is very easy to get to. This will allow you to see how to change one before you get to the hard ones.
Start by loosening the bolt for the coil, and start to unthread the bolt. Do not remove the bolt all the way out. You can use the bolt as an aid to removing the coil. To do this, unscrew the bolt most of the way out so it will be out of the block, but not out of the coil. You can then pull on the coil and it should separate from the engine. DO NOT FORCE IT! If it doesn’t come off, unscrew the bolt a little further and try again. If the bolt comes all of the way out and the coil still has not come off, thread the bolt in a few threads, and try again. If it still doesn’t come off, GENTLY pry the side of the coil outward with a flat screwdriver. The coil should then pop off.
Once you have removed the bolt, move the coil to the side and carefully remove the plug boot from the plug, so as not to tear or damage the boot. You can then use your 5/8” plug socket to remove the plug. After removing the plug, look at each one and check the condition to get information about the engine. The plug should be a dusty charcoal color if the engine is running properly. If there is oil on it, or the color is very black, there could be an oil leak. If it is a white chalky color, the engine may be running too hot. You can check with others with more experience if needed to diagnose the condition of the plugs.
It is now time to put the new plug in. Gap the plug if necessary (0.039 – 0.043 in.), however platinum or iridium plugs never should be gapped. It may damage the plug by doing so. Always install the new plug by hand until it can now longer be tightened any farther. This will keep the plug from getting cross threaded. The threads can be easily damaged if using a wrench to insert and tighten it. Once the plug is as tight as you can get it by hand, use a wrench to snug it up. Do Not Over tighten the plug. After you torque the plug (13 to 17 ft. lbs. / 18 – 24 Nm), inspect the plug boot and wires for cuts, cracks, or tears before putting it on. If there is, you will need to replace the boot, because electricity will arc across to the engine block and short out the plug. This will cause rough idle and other negative symptoms. When you put the boots back onto the plug, you should feel it click into place.
NOTE: A little smear of dielectric grease (sometimes sold as “tune-up grease”) inside of the boots of the spark plug wires will prevent corrosion, and aid in boot removal the next time the plugs are serviced.
Continue down the driver side to the next plug and then move to the passenger side and do those three. The last plug, (closest to the firewall, on the driver side), will be the biggest challenge to change. It has very little space to work in. It takes some patience to get the job done.
Some have been able to change it without using the access hole that is in the wheel well. If you don’t need to remove the plug and use it, it will be one more step that you won’t have to do. The access hole is just big enough to get an extension through, so it is still challenging.
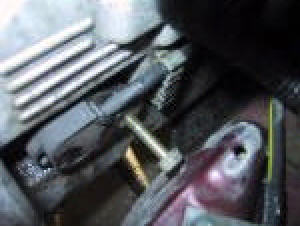
To get to the access hole, you will need to jack up the car on the driver side. Once the vehicle has the wheel off of the ground, use the jack stands to stabilize the car. When the car is secure, you will see that the wheel will lower out of the way so you can get access to the access plug in the inside of the wheel well (see next picture). It is a rubber plug filling a 1” round hole in the wheel well. You can pry this out using a flat blade screwdriver.

Once it is out, you will see that there is another plug that is on the inside of the engine bay. It can be pushed out from the wheel side into the engine bay (just push the back side with the screwdriver). You should now have a direct line of sight to the last coil bolt. The socket usually will not fit through the access hole, so you will have to push the extension through the hole and put the socket on from the engine side. Remove the bolt the same way you did the others. This is a very difficult bolt to get to and the plug replacement is not easy either.
Finishing Up
Put everything back together that was taken out for better access, rubber plugs, battery and air box.Many people have taken several hours the first time they do this job, but others have done the whole process in 30 minutes or so. If you know of someone like that, call them up and offer them a favorite beverage of their choice to show you how to do the whole job in that amount of time. Watch and learn. You will then be good for another 60,000 to 100,000 miles before you need to be shown again.