Throttle Position Sensor Testing
Author: svx_commuter
Here is a way to test the Throttle Position Sensor (TPS). Get a piece of ¼" plywood approximately 2 feet square (I had one left over from the Honey Do medicine cabinet). Using the TPS for a template, cut out a hole in the lower left corner. Mount the TPS from the bottom with a couple of screws to hold it in place. Insert a 7/32 allen wrench into the TPS and mount a long arm to the allen wrench.

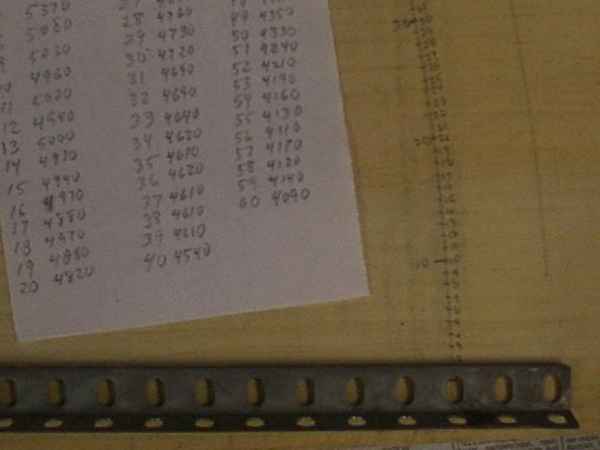
Using the arm as a compass, draw about a 22" radius on the board. Mark off 1/8" increments on the radius line, number the marks and then start a chart. This works well. For every 1/8" of movement at 22" radius, the resistance changed about 10 ohms. The TPS is only moving about .003" for each 1/8" movement at 22". (I can't do that when I try to hold it in my hand and check it!)
The ECU in my car had given me the TPS trouble light code some time ago. I took it out and cleaned it and the trouble code has not come back. However, I have a 2-3 shift flare, so I thought I would try a new TPS. Now having completed this test, the TPS was indeed bad.
During this testing on the "BOARD" I duplicating a small range of displacement, similar to the light throttle driving I was doing when the slip occurred. This resulted in some very erratic readings. The motion was duplicated by moving the long arm on the TPS back and forth between positions 32 and 40 several times for an example. Sometimes the readings were okay, the resistance dropped as it should but other times the resistance went way up instead of going down. It isn't supposed to do that! This was very surprising. I really thought the old TPS was not going to be a problem. Check out the TPS_CHART in the locker.
To remove the TPS, remove the SVX plastic cover over the throttle body. Pull it straight up in the back (the side near the fire wall) about 2" inches (don't pull it more than that!) and the plastic "fake screw" expansion pins will pop out. Hold the front of the cover down while pulling up because there are tabs under the center aluminium cover that can break. (One of mine was broken when I got the car.)
Use some "white out" to match mark the TPS to the throttle body right on the top of the TPS. (Everybody has white out and that stuff has lasted a long time on my TPS.) The TPS will be back in the same place when the match marks are lined up. Remove two vacuum hoses and the large hose that goes over the TPS. These will get in your way otherwise.
Remove the TPS wire harness connector. This is a lot easier to get off than the O2 connector. Just push in the release strip and tug. It comes off easy.
Remove the screws holding the TPS and drop them into the area under the intake manifold "No mans land". Have a long magnetic ended pointer available to retrieve the screws or extra screws or just don't drop them.
Connect the ohm meter leads with alligator clips to the TPS. This keeps them from falling off the TPS when it goes back in. These clips should have insulation jackets on them so they don't short against each other. Connect to pins 2 and 3. There are 3 pins, 2 is in the middle and 3 is on the bottom when the TPS is installed. Put it back in place and take your time because the alligator leads have to go under the intake manifold and they can fall off.
Measure the resistance with the throttle closed. This is the reference resistance for the new TPS. For the TPS was mounted on my car, it read about 4630 ohms with the throttle closed.
Well this is the method I like. After burning my hands on the intake manifold while trying to attach leads to the pins and then trying to hold leads on the pins and then given up, this appears to be the easiest way.